
Automatic
Pixel Ruler
Pixel-perfect screen measurement app with GPU-accelerated edge detection. Automatically detects and dimensions UI rectangles in real time.
Overview
Automatic Pixel Ruler is a Windows desktop tool that overlays real-time pixel measurements on your screen. Using GPU-accelerated screen capture, image pre-processing, and computer vision detection, it automatically identifies rectangular regions and displays their dimensions without any manual drawing.
It runs as a compact, always-on-top panel alongside your other running applications. A full-screen transparent overlay continuously analyses every frame and renders measurement labels directly onto the display.
Key Capabilities
System Requirements
| Component | Requirement |
|---|---|
| OS | Windows 10 May 2020 Update "20H1" (version 2004 build 19041) or higher |
| Windows 11 is recommended, since it's 'required for a full mouse and keyboard passthrough overlay (see the remarks in Overlay & Detection chapter) |
Getting Started
Launching Automatic Pixel Ruler
The main panel opens in the bottom-right corner of your primary monitor. A transparent overlay simultaneously covers the entire screen and begins detecting rectangles.
Quick Start
- Launch Automatic Pixel Ruler — the overlay becomes active on your primary monitor immediately.
- Move your mouse over the captured screen. Coloured rectangles will appear around detected UI elements, with dimensions displayed in pixels. The status bar updates with the current captured rectangle count and processing time.
- Press Ctrl+Shift+X (default) to start or stop a manual line measurement. Press Ctrl+Shift+X again or Esc to cancel this measurement at any time.
- Press Right Ctrl to save screenshots of highlighted rectangles, if any, to disk.
- Press Shift+Right Ctrl to save screenshots of all detected rectangles, if any, to disk. Be cautious with this one, as it can generate a large number of files if many rectangles are detected
Samples
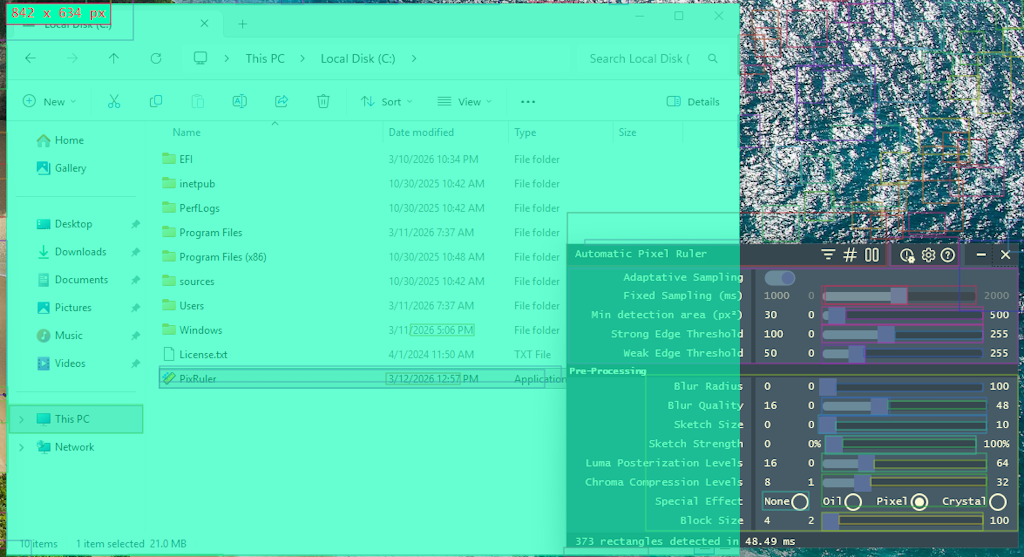
In the following example, Automatic Pixel Ruler detects the rectangular regions of a Windows Explorer window, including the title bar, address bar, and content area. The dimensions of each detected rectangle are displayed in pixels directly on the screen, allowing you to quickly assess the size of different UI elements without needing to manually draw measurement lines or switch between applications. The Pixel special effect is applied as a pre-processing step to the captured screen image before detection, which simplifies the image and enhances edges of Windows Explorer.
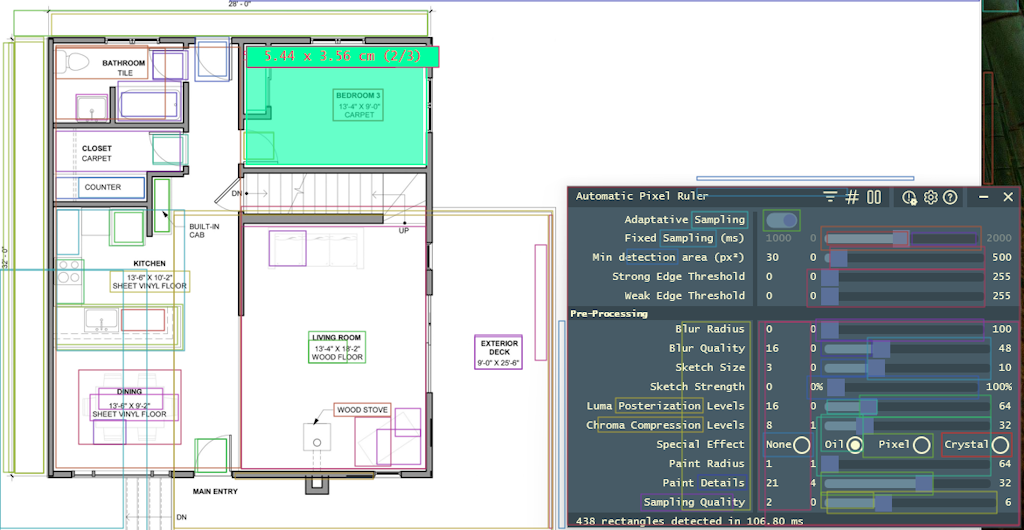
In the next screenshot, Automatic Pixel Ruler detects rectangular regions in a floor plan image. The dimensions of each detected rectangle are displayed in centimeters corresponding to the actual physical size on screen.
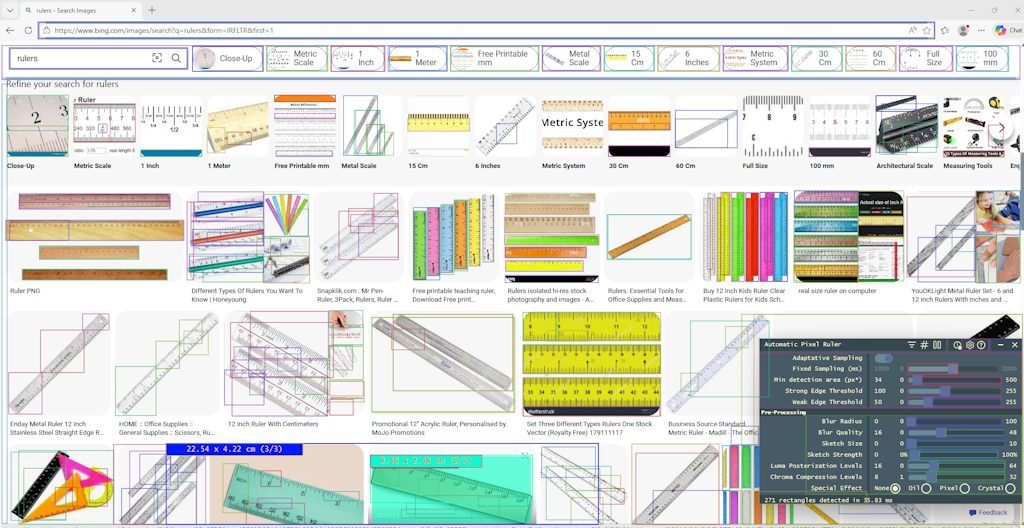
Measuring a web page in a browser window
In this example, Automatic Pixel Ruler detects the rectangular regions of a web page displayed in a browser window, including everything: the header, navigation bar, content sections, and images.
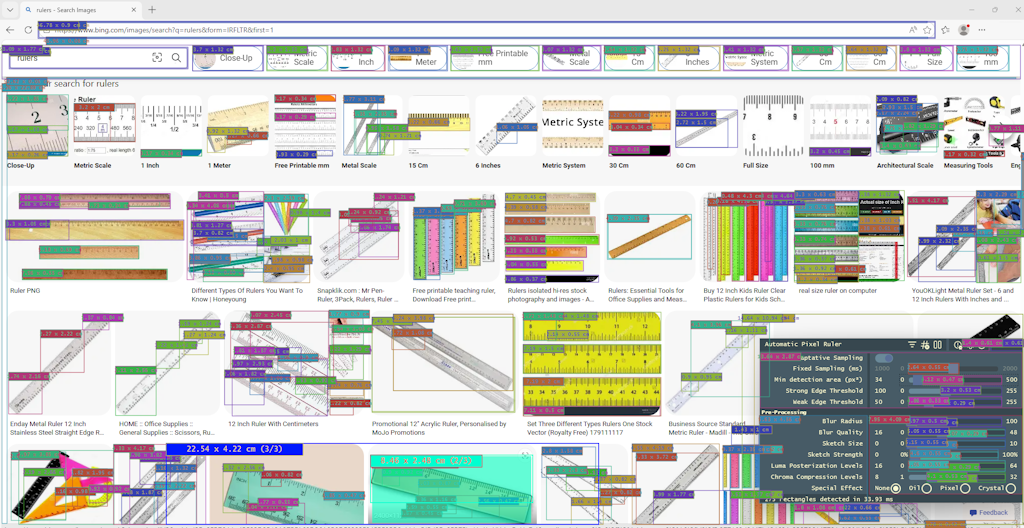
In the second image, all detected rectangles dimensions are displayed. Dimensions are shown in in centimers corresponding to the actual physical size on screen.
Measuring an image with heads and faces, with and without pre-processing
In this example, the Oil special effect is applied as a pre-processing step to the captured screen image before detection. This effect simplifies the image and enhances edges, making it easier for the detection algorithm to identify rectangular regions around heads and faces.
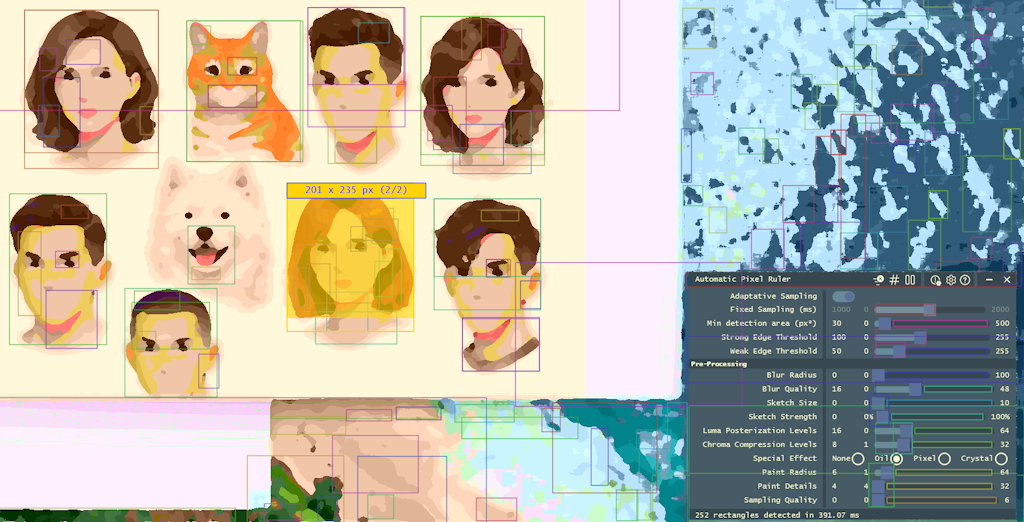
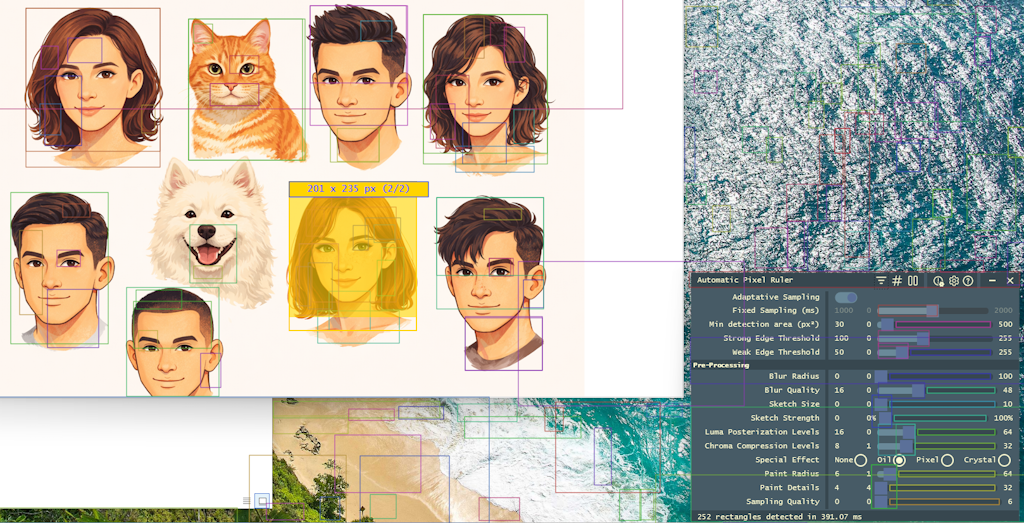
This is the exact same image and parameters, but the original captured screen image is shown instead of the pre-processed one. This can be toggled on and off in the interface, using or buttons in the title bar, to help you understand how the app is interpreting the screen content and how different pre-processing settings affect detection.
The Interface
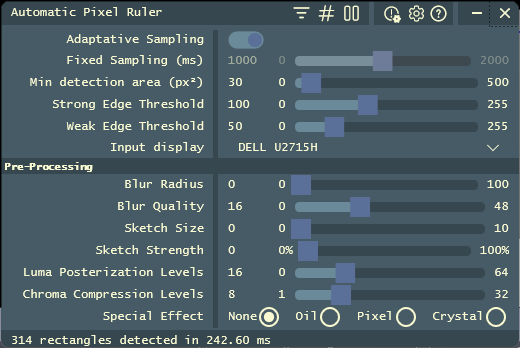
The main window is a compact, horizontally resizable panel with three zones: a title bar with app info and controls, a property grid for tuning parameters, and a status bar with a live readout of detected rectangle count and GPU processing time for the last captured frame.
Window Areas
-
Title bar — app title and interactive icons for key functions and dialogs:
About dialog with system info for diagnostics, this help page, Microsoft Store link, and credits.
Settings dialog with parameters, plus options to save and load tuning parameters presets to and from
.apixrulerfiles. Reset all settings to their default values.
or Pause or resume screen capture and detection. When paused, the overlay and all labels disappear, and GPU processing is reduced. The app continues to run, allowing you to adjust settings or move the window without the overlay getting in the way.
or Show or hide the dimensions of detected rectangles in the overlay. When dimensions are hidden, only the rectangle borders are shown, without any text labels. This can be useful if you want to see the detected shapes without the clutter of dimension labels. The effect is immediately visible in the overlay.
or Show pre-processed or original desktop image in the overlay. When enabled, the overlay displays the image after pre-processing steps (blurring, posterization, special effects, etc.) instead of the raw screen capture. This can help you understand how the app is interpreting the screen content and how different pre-processing settings affect detection. The effect is immediately visible in the overlay.
- Property grid — all tuning sliders and toggles, live-editable. Drag the column splitter to resize name/value columns.
- Status bar — throttled readout of detected rectangle count and GPU processing time for the last captured frame.
How it works
Before diving into detailed explanations of each setting, let's take a high-level look at how Automatic Pixel Ruler captures and processes screen data to detect rectangles in real time:
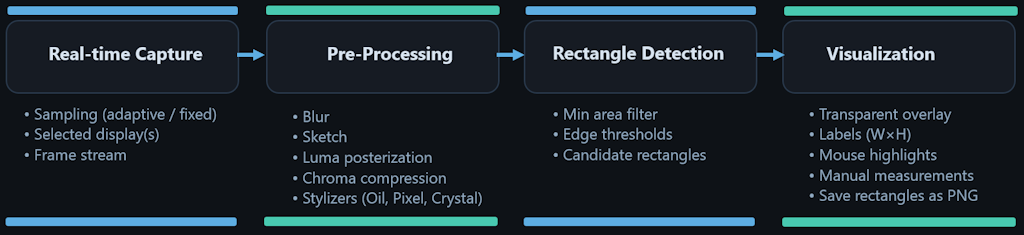
- Real-Time Capture: The app captures the screen content of the selected display(s) at a high frame rate using GPU-accelerated techniques. This allows it to grab raw pixel data with minimal latency and CPU overhead.
- Pre-Processing: Each captured frame undergoes a series of image processing steps to enhance features relevant for rectangle detection. This can include blurring to reduce noise, posterization to simplify colors, and special effects that can help highlight edges.
- Rectangle Detection: The pre-processed image is fed into a computer vision algorithm that identifies rectangular shapes based on edge detection and contour analysis. Detected rectangles are filtered based on size and other parameters to ensure relevance.
- Overlay Rendering: The app renders an always-on-top transparent overlay that draws borders and dimension labels around the detected rectangles directly on the screen. This overlay updates in real time as you move your mouse and interact with applications, giving you continuous feedback on detection performance and screen activity.
with variable parameters
When a value is being edited, pressing Up or Down arrow increments or decrements this value by 1, providing fine control.
Detection Parameters
Min Detection Area — Specifies the minimum side length a rectangle must have to be detected and displayed.
Rectangles smaller than this threshold are ignored, which helps filter out tiny or irrelevant shapes.
The default is 30 px. In this case, it is set to 74 px, meaning rectangles smaller than 74 × 74 = 5476 pixels (regardless of exact width and height) will be filtered out.Pre-Processing Parameters
Pre-Processing Special Effects Parameters
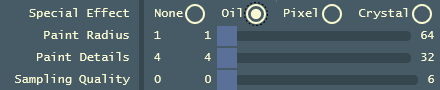

Overlay & Detection
The overlay is a full-screen transparent window sitting above all other windows, updated in real time. It captures the active display and processes frames, runs edge detection, and draws results. All Automatic Pixel Ruler windows are themselves excluded from screen recording and capture.
Automatic Rectangle Detection
Automatic Pixel Ruler continuously processes incoming frames from input displays. Rectangles meeting the minimum area threshold get a coloured border and a pixel-dimension label — e.g. 320 × 48. Each rectangle gets a unique color from its screen position so labels stay visually distinct.
Overlay & Input
When Automatic Pixel Ruler is running, the overlay is fully transparent to user input—mouse clicks and keyboard actions pass through to underlying windows. This allows you to interact with applications as normal while still seeing the measurement overlays on top. You can hover over buttons, menus, or any UI element, click anywhere or use the keyboard, to see captured rectangles list evolve in real-time.
However, some system-level controls remain usable. In particular, the Taskbar can still be accessed, and Alt + Tab can be used to switch between open windows.
The or Pause / Resume button in the title bar can also be used to temporarily disable the overlay, allowing you to interact with applications and then re-enable it when needed.
Highlights
All rectangles detected under the mouse pointer are highlighted.
A highlighted rectangle has a thicker border and a larger label displaying its dimensions (width and height).
For example, if the label shows 640 × 480 (2/5), it means this is the second rectangle, sized 640 pixels wide by 480 pixels high, out of five rectangles currently highlighted under the mouse pointer.
The list of highlighted rectangles is reset whenever the mouse pointer moves.
At a given mouse position, multiple rectangles may be detected (for example, a button inside a panel). However, only one rectangle is shown with a semi-transparent fill (of the same color as its border) to make it visually stand out as the active highlight. The active highlight is the last rectangle drawn, so it appears on top of the others.
Press Left Ctrl to cycle through the rectangles detected under the mouse pointer. Each press moves the active state to the next highlighted rectangle in the list.
Manual Line Measurement
In addition to automatic rectangle detection, you can measure the pixel distance between any two points on the screen by entering Manual Line Measurement mode. This is useful for measuring non-rectangular spans or verifying dimensions that may not be automatically captured as rectangles.
- Press Ctrl+Shift+X or the shortcut you have defined if you changed default settings. Your cursor position is recorded as the start point.
- Move the mouse anywhere. A live line is drawn with a bounding-rectangle dimension label.
- Press the shortcut again or Esc to cancel.
100 × 0.Saving Rectangles Screenshots
Press Right Ctrl to save PNG images of all rectangles currently highlighted under the mouse pointer. Each highlighted rectangle is captured and exported as a separate PNG file. During the saving process, the overlay window may pause briefly while the images are being generated and written to disk. This pause is normal and typically lasts only a short moment, depending on the number and size of the rectangles being saved.
Press Shift+Right Ctrl to save PNG images of all rectangles. Be cautious with this option, as it can generate a large number of files if many rectangles are detected on the screen.
The default file name format is Automatic Pixel Ruler, followed by the current date, an Automatic counter that resets daily, and, if multiple rectangles are highlighted under the mouse pointer, the index of the highlighted rectangle.
Keyboard Reference
| Key / Action | Effect |
|---|---|
| Left Ctrl | Enter Highlight mode and cycle through detected rectangles |
| Right Ctrl | Save all highlighted rectangles screenshots to disk |
| Shift+Right Ctrl | Save screenshots of all detected rectangles to disk |
| Ctrl+Shift+X | Toggle manual line-measurement mode (configurable in settings) |
| Esc | Cancel active line measurement |
| Shift+Ctrl at launch | Reset window position to default, ignoring saved state |
Settings
Click ⚙ in the title bar to open Settings dialog:
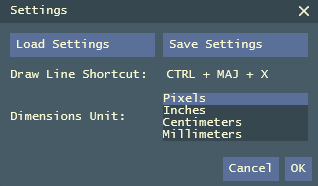
From there you can:
-
Save tuning parameters as an
..apixrulerfile -
Load tuning parameters from an
.apixrulerfile -
Change the keyboard shortcut for manual line measurement mode
💡if an incorrect key combination is entered, the app will show an "Invalid shortcut" error and keep the previous shortcut.
-
Define the unit used to display dimensions in labels (pixels, inches, centimeters, or millimeters).
Except for pixels, all units are calculated using the current display’s raw DPI, so they correspond to real-world physical sizes regardless of screen resolution or scaling. When All displays is selected as capture input, the DPI used to show dimensions is that of the display containing the largest portion of the dimensions' rectangle.
⚠️ The display's raw DPI is determined by the display's hardware EDID information. If this information is unavailable, which can happen on some old monitors or virtual machines, the Windows effective DPI is used, which may lead to inaccurate real-world measurements.
Resetting Settings
Click in the title bar and confirm to restore all visual tuning parameters to factory defaults. Other non-visual settings (such as dimensions unit, etc.) are not affected.
Files & Data
Settings File
Configuration is stored at:
This file is updated automatically on change and on close. A 30-day rolling backup of it is maintained int the settings.bak directory aside it. Close the application and delete settings.json to reset everything to defaults.
Screenshots
Saved as PNG files in the configured Save Directory (default: Pictures\Screenshots). Filenames encode the app name, date, and an incrementing counter.
Tuning Profiles
Individual parameter sets can be saved as .apixruler files (JSON format). Share between machines or keep as presets for different workflows.
.apixruler files can be associated with Automatic Pixel Ruler, allowing you to double-click them in Windows Explorer to load specific tuning profiles.
This is useful for quickly switching between different detection configurations for various tasks or sharing settings with others.
Tips & Troubleshooting
Optimisation Tips
- Missing small UI elements? Lower Min Rectangle Area and Weak Edge Threshold.
- For a more stylized detection that emphasizes larger shapes, experiment with Pre-Processing parameters and Special Effects.
- If the overlay feels too cluttered, try increasing Min Rectangle Area or adjusting edge thresholds to filter out less relevant rectangles.
- If you want to focus on specific types of UI elements, try using the Special Effects to enhance certain features in the captured image, which can help the detection algorithm identify relevant rectangles more effectively.
- Feel sluggish? Try disabling resource-intensive special effects like Oil or increasing their parameters to reduce GPU load, or lower the resolution of your display if possible.
- For precision layout work, use Manual Line Measurement alongside automatic detection.
- Use the Show Pre-Processed Image toggle to see how different pre-processing settings affect the captured image and detection results, which can help you fine-tune parameters for optimal performance. This is especially useful when experimenting with the various pre-processing effects, as it allows you to visually understand how each effect transforms the captured image and influences edge detection.
- For best performance, keep Adaptive Sampling enabled. If you prefer a fixed capture rate, set Fixed Sampling to a value that balances responsiveness and CPU/GPU load.
.apixruler files
-
You can store different
.apixrulerprofiles for various use cases, such as one for UI design with high sensitivity and another for general screen measurement with more conservative settings. Some settings are better for bitmap images (e.g. Blur, Oil or Pixel processor), while others work better for vector-rendered UI . Save these as separate.apixrulerfiles for easy switching. -
You can also share
.apixrulerfiles with colleagues or the community to exchange tuning configurations for specific applications or workflows. -
In Windows
.apixrulerfiles can be associated with Automatic Pixel Ruler, allowing you to double-click them in Windows Explorer to load specific tuning profiles.
To associate.apixrulerfiles with Automatic Pixel Ruler, right-click any.apixrulerfile in Windows Explorer, select "Open with" > "Choose another app", then select Automatic Pixel Ruler from the list and check "Always use this app to open .apixruler files".
Troubleshooting
| Problem | Resolution |
|---|---|
| Fails with "Not Supported" error | Update Windows to the required version. |
| Overlay active, no rectangles appear | Lower Min Rectangle Area, Weak and Strong Edge Thresholds. Verify correct Input Display is selected. |
| Overlay is too cluttered with rectangles | Increase Min Rectangle Area or adjust Edge Thresholds to filter out smaller or less defined rectangles. |
| Detection misses certain UI elements | Experiment with Pre-Processing parameters and Special Effects to enhance features relevant to the missed elements. |
| External screenshot misses the overlay | Screenshots are only saved for highlighted rectangles under the mouse. |
| Measurements in inches, cm, or mm seem inaccurate | If the application is running inside a virtual machine, the display size shown on the desktop may not match the virtual display’s true resolution, which can result in incorrect calculations. Try running the virtual machine in fullscreen mode. |
| Overlay blocks input (mouse, keyboard) on Windows 10 | Windows 10 doesn't support input passthrough for transparent overlays. Use Taskbar or Alt+Tab to switch windows, or upgrade to Windows 11 for full input passthrough support. |
| Pre-Processing effects cause high CPU / GPU load | Reduce parameters for effects like Blur, Oil, or Crystal, or disable them entirely to improve performance. |
| I can't really see the rectangle or the area I'm interested in | Use Left Ctrl to cycle through highlighted rectangles under the mouse pointer. The active highlight has a semi-transparent fill to make it visually distinct. |
| There are no saved screenshots after pressing Right Ctrl | Only highlighted rectangles under the mouse pointer are saved as screenshots. Ensure you have highlighted rectangles before saving. |
| Manual Line Measurement doesn't activate | Check or reassign the shortcut for manual line measurement mode in Settings. Must include Ctrl and must not conflict with another app's hotkey. |
| App starts but immediately crashes | Try resetting settings by holding Shift+Ctrl while launching to ignore saved window position. |
Diagnostics & Licensing
Click in the title bar to open About dialog:
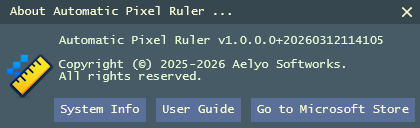
From there you can:
- Open a System Info window to send to support for troubleshooting
- Open this User Guide
- Go to the Microsoft Store page to leave a review, get support, or purchase the app if you haven't already